Some Basic Information About My Site and My Files:

First a note about my files:


All my files are for personal use. I do not charge for any files I create. I share them here for others to use for personal use only. Please do not use them to submit for contests, etc. without getting my permission first. Please give credit where credit is due. I will try to do the same. This means I will try to identify where I got an item or a project if I didn't create it myself and there is an identifable source. Sometimes however I use basic clipart or coloring pages. You may however share these files with others for their personal use (you may not charge for them - you may pass them on for free) or you may point them here to my blog to get the files themselves. If a download file is available, it will appear at the bottom of the post and will be in a different color text.


PLEASE NOTE: I reside in the USA where we use the MM/DD/YYYY date format on computers (and in everything else we do!) If you are outside the USA where they use the DD/MM/YYYY date format on computers, you MAY experience an "Unhandled exception" error when you try to open one of my Cricut DS files. It is an error related to the date format. An easy fix is available at SusanBlueRobot's Blog. Susan has a simple HexEdit program and directions which will allow you to alter the date so you can use the files. Note: This is only an issue if the save date of the file is after the 12th of the month! It is also only an issue with DS files. I have never seen this issue with MTC or SCAL.

Tuesday, March 24, 2009

Clock for DazyCutr's Birthday!

Here is a clock I created for my friend DazyCutr (Rheba) from the Cricut Messageboard. I created it for her birthday which was 2 weeks ago. However, we weren't able to get together until today so I was just able to get it to her and finally get it posted here for all to see. I think she liked it! The clock is from Walmart (under $5). The Bughead is from the Storefront cartridge. The pups are from Paper Pups (because Rheba is the queen of Paper Pups!) I used vinyl to cut out the bug head, the "tick marks", the pups, and her name, DazyCutr! It stuck great but can be "lifted" if placement is off or if she wants to change the shapes on her clock in the future!

Tower Box for SCAL (Sure Cuts A Lot)

Well - we made it back from visiting the big Mouse and his friends in Orlando. We had a great time. But good to be back home and back in the "routine" of school and life!
Here is a "tower" box that I created using SCAL (sure cuts alot). In working with SCAL to make this box, I realized that SCAL doesn't allow you to have multiple "mats" or pages in one file. You can in DS. This is helpful so that you can create different "items" that go with one file. For example, a full box on one mat and then the same box with a "cut-out" or "window" on another mat and then the "window" shape on another mat and the score lines on yet another mat! :( bummer. So, there is only one "box" in this file. I think where to score is obvious. If not, let me know and I will try to post directions or photos. Download the .svg file for the tower box here. Download the .scut file (SCAL) file here.

Saturday, March 14, 2009

On my way to see the Mouse!

Hey just a quick note. Our Spring Break is this week, March 14-21st. We are on our way to see the Mouse and friends for the week. (Mickey Mouse that is!) So, you probably won't see much if any activity this week. But please check back. Have a great week!

Wednesday, March 11, 2009

Yudu Machine - Screen Printing and my Cricut

Okay, so I wasn't going to purchase this machine. I really wasn't. However, I did! LOL. I have created a few items with it. Have other ideas to do with it. Just haven't gotten there yet! The machine is fairly large as shown in the pictures here. I have used my Expression machine in the pictures to give you some perspective on its size. We have created some items with the emolsion on the screens. I would reserve that option for when I had "several" of something that I wanted to create. I have also created an item using a "paper stencil" taped to the screen. I would recommend this method if you want to create a "one of a kind" item. I will post more "info." as I can in relation to this machine. The first project I am posting used my Yudu and supplies as well as my Cricut machine, Design Studio, Wedding, Paper Pups and Storybook cartridges. I created my design in DS with the 3 cartridges. I then cut it out on black paper and "copied" it on my all-in-one copier onto a Yudu transparency. I then followed the Yudu instructions for "burning" the image onto a screen that has been prepared ahead of time with the emolsion sheet following the Yudu directions. I called this Design the "Paper Pups Queen". I did it for my good friend from the Message Board, Dazycutr (Rheba), who is known as the Queen of Paper Pups because she loves to use the Paper Pups cartridge in her card designs! I then put the design on a t-shirt, a bag, and a print for framing as a gift for Rheba.

Cupcakes .svg file


Here is a set of cupcakes. They are an .svg file. They can be used with graphics programs like Inkscape or IMPORT it into Make The Cut (MTC) or SCAL (Sure Cuts a Lot). They cannot be used with Design Studio (DS) or the Gypsy. There are several layers to each cupcake. The base shape. The icing which has 2 layers to each cupcake. The second cupcake has a cherry and finally, both have the wrapper layer. Download the cupcakes .svg file. Download the cupcakes .scut file.

Rollerblader .svg and .scut files for Cricut Machines


Here is a rollerblader. Again, I am uploading both the .svg file which you can use in any graphics program like Inscape or IMPORT into Sure Cuts a Lot (SCAL). The .scut file is a SCAL file. You would OPEN the .scut file in SCAL directly (not import). These files will not work with Design Studio (DS). Download the rollerblader .svg file. Download the rollerblader .scut file here.

Monday, March 9, 2009

Skateboarder .svg & .scut Files for your Cricut (Cannot be used with DS)

Hello. I've been working on many things. Some of which I can share with you now. Some that are still works in progress. Some of what I have been doing is trying to create things with Inkscape and SCAL to cut with our Cricut Bugs! Here is a skateboarder. I am posting both an .svg file of him and an .scut file. The .svg file can be used in Inkscape and other graphics programs or can be IMPORTED (not opened) in SCAL. The .scut file is a SCAL file that simply needs to be OPENED (not imported) in SCAL. Download the skateboarder .svg file. Download the skateboarder .scut file. NOTE: neither of these files can be used with Design Studio (DS).

Monday, March 2, 2009

Round Top Box - Look what you can do with it! Requires Expression Machine & George Cartridge

Hello. Here is my latest creation. The "credits" here are long so let me say the original PDF pattern for this "Round Top Box" was posted at the splitcoaststampers Website in their challenges forum by Lynn in St. Louis. You can find that thread by clicking here.
I "found" it when SusanW posted a "bunny box challenge" on the Cricut MB with a link to a bunny box posted by Sandi at sandimaciver.com. Sandi said she had gotten the pattern from Lynn's post at splitcoaststampers. You can find Sandi's thread and box by clicking here.
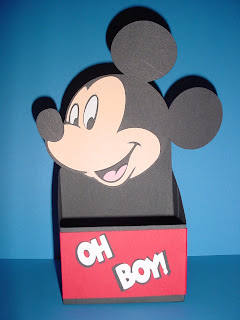
I am posting my version of the box and two creations that I made with it. I did a "bunny box" and then I did a Mickey Mouse box to show you that you could do other things with it besides create a "bunny treat holder". Due to the size of the file, it does require the 12x12 mat and therefore the Expression machine to cut it. The regular box file only uses the George cartridge. The bunny box file uses either George for the box and the bunny in my picture or, if you prefer, it has a page using the Doodlecharms cartridge's bunny. Finally, the Mickey Mouse Box uses George and the Mickey Font Cartridges.
There are links to other examples using this style box at the Splitcoaststampers link above. Besides my version, JodyP and Maria_Macias created versions and posted them on the Cricut Message Board in the Design Studio Forum as well. They both had a different take then mine.
There are 3 options to download my .cut files for this box. The first option is the plain, Round-Top Box .cut file. The second option is the Round Top Bunny Box .cut file. The third option is the Round Top Mickey Mouse Box .cut file. Once you cut out the box and put it together, you just "paste" the bunny head or Mickey's head into place on the round back top of the box.
Other ideas I had for this was items related to a baby, birthday, etc. Just haven't had time to get to those yet! Hope you can use my files. Don't forget to let me see what you do with them.
Thanks for stopping by!

Sunday, March 1, 2009

BookMarks for Emily - Plantin Schoolbook Cartridge

Emily (FboPhotoMama) on the Cricut MB wanted help creating some bookmarks. She only has the trial version of the Design Studio (DS) software, the Expression, and the two cartridges that came with it, Accents Essentials and Plantin Schoolbook. She wanted to have bookmarks that had an "overlay" to them to add a cut-out design and then layer them together on one. The other one she wanted a daisy on the top and then a daisy to layer on the top of the card. Hopefully you can "see" this from the pictures I posted above! Since Emily had the Expression, I created the .cut file for it. Download the Bookmarks/Expression Size .cut file here. I then went back and removed some of the bookmarks so that it could be used with the smaller bugs as well. Download the Bookmarks/Baby and Create Size .cut file here.

School Bus Card - My Community & Accents Essentials

Finally, here is the shape card that DazyCutr (Rheba) and I worked on together to show her how to use the weld, hide contour, page labeling and more in the Design Studio (DS) Software. She had a friend who needed a "school bus" card. Since Rheba liked the bus on My Community we used that cartridge. Accents Essentials was only used to add the "stop sign" to the bus. It will cut with any of the bugs. Download the School Bus Card here.

More Shaped Cards - Ice Cream from Doodle Charms and 2 Paper Pups Cards

Here are a few more examples of shaped cards that I have recently done. They will work with any size of the bugs. DazyCutr (Rheba) from the Cricut MB and I have been getting together to do things for a few weeks now. She wanted me to show her some of the basics with the Design Studio software. So I thought I would show her how to do basic shaped cards. Since she is the Queen of the Paper Pups I knew just which cartridge to use! I also used the ice cream cone from Doodlecharms and created an ice cream cone card. You really don't need .cut files for any of these cards as they are really very simple to do. However, I will post the .cut files just in case someone wants them. Looking at them would also be a great way to "see" how to do a simple shape based card like this.
Download the Ice Cream Cone card here. Note the Ice Cream Code Card used the Hide Contour feature to hide parts of the ice cream. Usually, this doesn't "save" in the file. We'll see!Download the Two Pups cards here. Finally, download the Smile Dog card here.

Peek-a-Boo Pocket Gift Card

This last gift card holder is called a "Peek-a-Boo" Pocket. I saw the basic idea for it on the paperwishes.com web site back last summer and created the .cut file back then. Again, I think it's pretty obvious how to "fold" to get your gift card holder but I've included some photos to show you where to fold. Glue the bottom flap (the one with the oval) on the left and right sides after you have folded it up so that you leave it open at the top where the oval is cut out of it. This is where the gift card goes. The open circle on the band was cut with a Spell Binders Nestabilities die cut. Uses the George cartridge.
The final finished folded size is 4 1/2 x 4 1/2 inches. Download the Peek-a-Boo Pocket Gift Card Holder .cut file here.

"Tri-fold" Gift Card Holder

This is another gift card holder. It is a "tri-fold" gift card holder. As you fold it 3 times. First you fold it in the middle so that you create a "page" with the slit in the middle of that page. This is where the gift card is placed. Then you fold so that you have the "front cover" and then the "back cover". You glue down the back and sides of the middle fold making a pocket. There are 2 files in this one .cut file. There are files for a small holder which is approx. 4 1/4 x 3 inches and a larger holder which is approx. 5 x 3 inches. It uses the George cartridge.
I will have to update my post with the "where" I saw this. It was a You Tube Video from someone with Stampin Up. I created it and thought, oh - I could do that with the Cricut then created my .cut file. I hope you can find it useful.
I've uploaded a couple of pics for you to better "see" how it works.
Download the "Tri-fold" Gift Card Holder here.

Simple Gift Card Holders

I have created a number of different gift card holders. So I have several different .cut files for them. I will try to upload them all here.
The first one is a basic gift card holder. The .cut file has two files in it. One is a small gift card holder that is approx. 3x4 inches. The larger one is approx. 5 x 3 1/4 inches.
The front of each could be modified and have any "shape" added to it instead of the rectangle.
I think it should be obvious where to "fold". You fold twice. Glue down the 2 sides (top and bottom) where the gift card holder slides in leaving one "side" (where the half oval is cut) open to slide the card in and out. George Cartridge used.
Download the Basic Gift Card holder .cut file here.