Some Basic Information About My Site and My Files:

First a note about my files:


All my files are for personal use. I do not charge for any files I create. I share them here for others to use for personal use only. Please do not use them to submit for contests, etc. without getting my permission first. Please give credit where credit is due. I will try to do the same. This means I will try to identify where I got an item or a project if I didn't create it myself and there is an identifable source. Sometimes however I use basic clipart or coloring pages. You may however share these files with others for their personal use (you may not charge for them - you may pass them on for free) or you may point them here to my blog to get the files themselves. If a download file is available, it will appear at the bottom of the post and will be in a different color text.


PLEASE NOTE: I reside in the USA where we use the MM/DD/YYYY date format on computers (and in everything else we do!) If you are outside the USA where they use the DD/MM/YYYY date format on computers, you MAY experience an "Unhandled exception" error when you try to open one of my Cricut DS files. It is an error related to the date format. An easy fix is available at SusanBlueRobot's Blog. Susan has a simple HexEdit program and directions which will allow you to alter the date so you can use the files. Note: This is only an issue if the save date of the file is after the 12th of the month! It is also only an issue with DS files. I have never seen this issue with MTC or SCAL.

Showing posts with label Doodlecharms. Show all posts

Friday, September 4, 2009

Some Simple and Quick Birthday Cards


My DD and I made a lot of simple cards that we gave to my mother-in-law at Christmas for her to use to send out to friends and family. She recently mentioned that she needed "more" birthday ones as she had sent out the last one! LOL So, I went to work making some quick and simple cards. I used card bases that I had previously purchased. Some were plain white, others had a design already on the front that I "added" to. Here are a few samples of some of those cards.


The first card used a plain white base, cut a piece of "dotted paper" to fit and applied to the front of the card. Then added a cupcake cut from A Child's Year to it and used stickles on the cupcake and around the edge of the dotted paper. Inside it says "Happy Birthday Cupcake."


The second card also used a plain white base, cut a piece of paper with different types of ice cream (including a popcicle on it, used a marker to "outline" the edges (Be careful when you do this - I used one that "bled" through to the inside top of the card and so I then used an inside liner paper to cover that up!). The popcicle cut was cut from the Doodlecharms cartridge (I think!). I added some marker around its edges and some stickles to it. The small blue oval was cut out for the "saying" I wanted on the front which is "how old would you be if you didn't know how old you were." I lked that as most of us remember having popcicles as children. Inside it simply says Happy Birthday.


The third card had "birthday" grettings all over the front of the card already. So, I simply added the silhouette cut of 3 children playing together from A Child's Year cartridge to the front of the card and inside again used the stamp that said "how old would you be if you didn't know how old you were."


3 simple but quick birthday cards. Hope someone likes them! I do these "simple" because I figure they are "looked at" and then tossed so I don't put a lot of work into them!

Monday, April 6, 2009

Small Square Treat Box or Cupcake Box


Here is my version of a cupcake box or small square treat box. There are many versions out there. Due to the size of the box, it does require the Expression to cut it out! It uses George, Plantin Schoolbook for the basic box, lid and inserts. If you only have George, you can replace the Plantin "parts" with similar George parts and vice versa if you only have Plantin, replace the George with similar Plantin "parts". Then I've included different "cut-outs" for the lid. The ones used in the picture is Storybook on the green box and Doodlecharms for the bunny on the pink box. The page of other items can be used to "swap" out the cut out on the lid, or just used as a "reference tool" to give you ideas as to what you could do. When you cut out the "object" on the lid, you just create a bigger size of it or a circle to cut out of actetate or thin plastic to "cover" the hole so it is "sealed" but you can still see into the box. I usually use overhead transparencies but any thin recycled plastic will do! If you want to use the box as a cupcake holder, cut out the "insert" to hold the cupcake in place. If you just want to use the box as a "treat" holder, you don't need to cut out the insert for the cupcake!
Download the Cupcake Box/Treat holder .cut file here.

Easter Basket - Treat Bag


Sorry for the "time lapse" in posts. Not sure where all my time is going. Seems like if you take a vacation - it takes you two or three weeks to "catch up"!!

Here is an "Easter" basket treat bag. My DD Kaitlyn and I made the cut file last year for Easter. It uses the Expression machine (sorry! :( ), Plantin Schoolbook for the bag and circle cut, and Doodlecharms for the basket. I then embossed the basket using a cuttlebug embossing folder in my original big red sizzix with the adaptor plate. (Yes, you can use the cuttlebug dies and embossing folders in the both the original sizzix machine (with the adaptor plate) as well as the Big Kick). You will need a piece of acetate or thin plastic of some kind to cut the circle for the "see through" part of the bag/basket. I use overhead transparancies. The "chick" was a die that was cut out in black, scanned into my computer and saved as a .jpeg image, then imported into Inkscape, converted to an .svg file, and then IMPORTED into SCAL. It was then cut with SCAL on my Cricut. To get the "shadow" just select the shadow feature when the image is imported into SCAL. It is quite easy! The bag may end up a little "long" (about a 1/4") on one side, not sure why since we did this last year and I don't remember this problem. If it does, just trim it off with scissors. I haven't had time to "figure" it out at this time!

Download the Easter Basket Treat Bag .cut file for use with Design Studio and the Expression.

Downlaod the Chick .scut file for use with SCAL and any of the Cricut Bugs.

Monday, March 2, 2009

Round Top Box - Look what you can do with it! Requires Expression Machine & George Cartridge

Hello. Here is my latest creation. The "credits" here are long so let me say the original PDF pattern for this "Round Top Box" was posted at the splitcoaststampers Website in their challenges forum by Lynn in St. Louis. You can find that thread by clicking here.
I "found" it when SusanW posted a "bunny box challenge" on the Cricut MB with a link to a bunny box posted by Sandi at sandimaciver.com. Sandi said she had gotten the pattern from Lynn's post at splitcoaststampers. You can find Sandi's thread and box by clicking here.
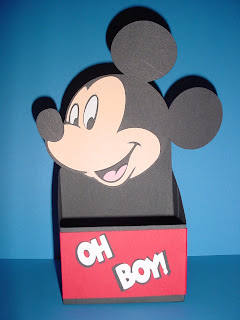
I am posting my version of the box and two creations that I made with it. I did a "bunny box" and then I did a Mickey Mouse box to show you that you could do other things with it besides create a "bunny treat holder". Due to the size of the file, it does require the 12x12 mat and therefore the Expression machine to cut it. The regular box file only uses the George cartridge. The bunny box file uses either George for the box and the bunny in my picture or, if you prefer, it has a page using the Doodlecharms cartridge's bunny. Finally, the Mickey Mouse Box uses George and the Mickey Font Cartridges.
There are links to other examples using this style box at the Splitcoaststampers link above. Besides my version, JodyP and Maria_Macias created versions and posted them on the Cricut Message Board in the Design Studio Forum as well. They both had a different take then mine.
There are 3 options to download my .cut files for this box. The first option is the plain, Round-Top Box .cut file. The second option is the Round Top Bunny Box .cut file. The third option is the Round Top Mickey Mouse Box .cut file. Once you cut out the box and put it together, you just "paste" the bunny head or Mickey's head into place on the round back top of the box.
Other ideas I had for this was items related to a baby, birthday, etc. Just haven't had time to get to those yet! Hope you can use my files. Don't forget to let me see what you do with them.
Thanks for stopping by!

Sunday, March 1, 2009

More Shaped Cards - Ice Cream from Doodle Charms and 2 Paper Pups Cards

Here are a few more examples of shaped cards that I have recently done. They will work with any size of the bugs. DazyCutr (Rheba) from the Cricut MB and I have been getting together to do things for a few weeks now. She wanted me to show her some of the basics with the Design Studio software. So I thought I would show her how to do basic shaped cards. Since she is the Queen of the Paper Pups I knew just which cartridge to use! I also used the ice cream cone from Doodlecharms and created an ice cream cone card. You really don't need .cut files for any of these cards as they are really very simple to do. However, I will post the .cut files just in case someone wants them. Looking at them would also be a great way to "see" how to do a simple shape based card like this.
Download the Ice Cream Cone card here. Note the Ice Cream Code Card used the Hide Contour feature to hide parts of the ice cream. Usually, this doesn't "save" in the file. We'll see!Download the Two Pups cards here. Finally, download the Smile Dog card here.